
Leaf Blower
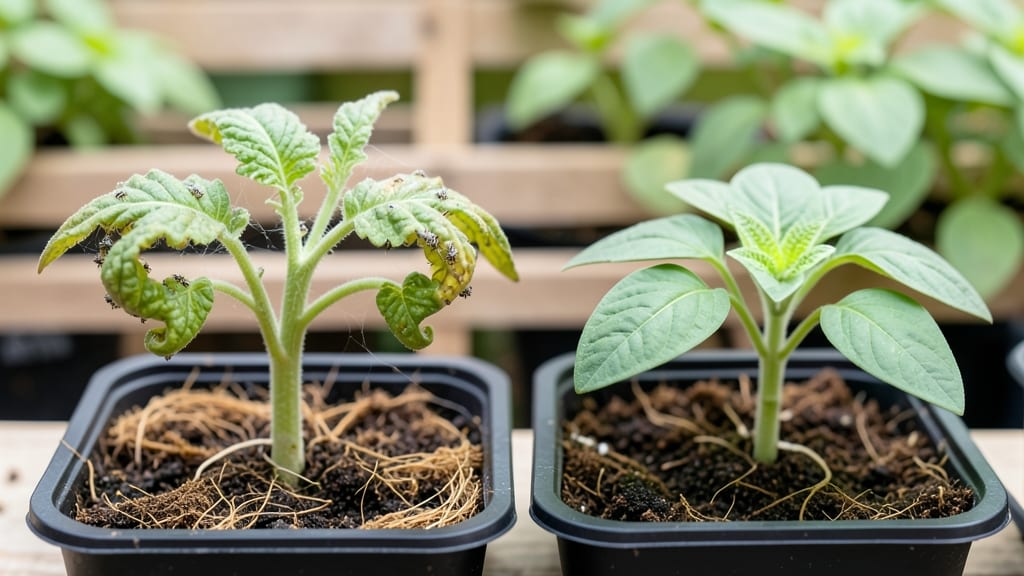
Seedling leaf curl turns crisp new edges into sad, crinkled messes overnight—and copper spray is the fastest fix when pests or disease strike. 🌱 I’ve seen entire trays of seedlings saved with just one targeted spray, but timing matters: catch it early or risk losing your plants before they even hit the garden.
The culprits are usually tiny: spider mites hiding on the undersides of leaves, fungal spores clinging to moisture, or even environmental stress from sudden temperature swings.
My first batch of tomato seedlings curled after a cold snap, and I panicked until I spotted the webbing—then the copper spray worked like magic in 48 hours.
You’ll mix a simple solution (1 tablespoon copper fungicide per gallon of water), spray in the early morning to avoid scorching, and watch those leaves unfurl back to normal. The key is consistency: treat every few days until new growth appears straight and healthy.
Works for seedlings indoors, in greenhouses, or even in your backyard—just adjust the spray distance based on plant size. Here’s how to diagnose and treat it right the first time.
Root Causes Of Leaf Warping
When your seedlings sport curled, crinkled, or twisted leaves, it’s rarely a random act of nature—it’s a distress signal. Understanding the underlying causes helps you diagnose the problem fast and apply the right fix (like copper spray, which we’ll cover later).
Below, we break down the most common triggers for leaf curl in seedlings, from environmental stressors to hidden pests, with clear explanations of why they happen.
Seedlings are delicate, and extreme temperatures—whether too hot or too cold—can cause leaves to curl as a protective response. Here’s the science:
- Heat shock: When air or soil temperatures rise above 85°F (29°C), seedlings struggle to regulate water loss. Leaves curl upward (a process called hyponasty) to reduce surface area and minimize evaporation. 🌡️
- Cold damage: Below 50°F (10°C), cell membranes stiffen, disrupting nutrient flow. Leaves may curl downward (epinasty) or develop a glass-like texture.
- Fluctuations: Rapid temperature swings (e.g., sunny windowsills at night) confuse seedlings, leading to uneven growth and curling.
Actionable fix: Use shade cloth for direct sun, move seedlings to a stable environment, or use a heat mat for cold drafts.
Water is the lifeblood of seedlings, and imbalances trigger curling as a survival tactic. The two extremes:
| Issue | Why It Happens | Leaf Response |
|---|---|---|
| Underwatering | Soil dries out, and roots can’t absorb water. Cells plasmolyze (shrink), causing leaves to curl inward to conserve moisture. | Dry, crispy edges; leaves roll tightly. |
| Overwatering | Soggy soil cuts off oxygen, suffocating roots. Ethylene gas builds up, signaling leaves to curl as a stress response. | Yellowing; leaves curl upward or develop a glossy sheen. |
| Uneven moisture | Spotty watering (e.g., only topsoil stays wet) forces roots to compete, leading to stunted water uptake. | Patchy curling; some leaves stay flat. |
Actionable fix: Check soil moisture with your finger—top 1 inch should be damp but not soggy. Use well-draining soil and trays with drainage holes.
Sap-sucking insects like aphids, thrips, or whiteflies inject toxins as they feed, causing leaves to curl, pucker, or distort. Here’s how:
- Saliva injection: Pests inject enzymes that break down plant cells, triggering a defense curl to trap the invader.
- Hormone disruption: Some pests (like aphids) secrete growth hormones that warp leaf development.
- Secondary infections: Damaged leaves become entry points for fungi or bacteria, worsening curling.
Actionable fix: Inspect undersides of leaves for pests. Use neem oil or copper spray (our hero fix!) to disrupt their life cycle.
Leaves curl when seedlings can’t access essential nutrients, often due to:
- Nitrogen (N) deficiency: Leaves curl and turn yellow (chlorosis) because nitrogen is critical for chlorophyll production.
- Potassium (K) shortage: Leaves curl at the edges (a classic scorch symptom) because potassium regulates water and enzyme activity.
- Magnesium (Mg) lack: Older leaves curl and develop interveinal yellowing since magnesium is central to chlorophyll.
Actionable fix: Test soil pH (ideal: 6.0–7.0 for most seedlings). Amend with compost or a balanced fertilizer (e.g., 10-10-10).
Wind, humidity, and even transplant shock can curl leaves by physically damaging cells or disrupting growth patterns.
- Wind burn: High winds desiccate leaves, causing edges to curl or tear.
- Low humidity: Dry air pulls moisture from leaves faster than roots can replace it, triggering a curl.
- Transplant shock: Roots damaged during repotting can’t absorb water/nutrients, leading to temporary curling.
Actionable fix: Use a humidity dome or mist seedlings. Acclimate them to outdoor conditions gradually (hardening off).
Pro tip: 🔍 Rule out one cause at a time. Start with water and pests (easiest to spot), then check soil and environment. If curling persists, copper spray can address fungal/bacterial infections or nutrient imbalances—more on that in the next section!
Fixing Crinkled Seedling Leaves Fast
If your seedlings are sporting curled, crinkled edges instead of smooth, vibrant leaves, don’t panic—there are practical ways to turn things around. The key is identifying the root cause (whether it’s environmental stress, pests, or nutrient imbalance) and applying the right fix.
Below, we’ve mapped out step-by-step solutions for the most common triggers of leaf curl in seedlings, plus prevention tips to keep your plants thriving.
---
When seedlings curl due to temperature swings, wind, or poor humidity, the fix is often as simple as adjusting their growing conditions.
#### 🔥 Adjust Temperature Gradually - Move seedlings to a spot with consistent temps (ideal: 65–75°F during the day, 55–65°F at night). - Avoid placing them near heaters, AC vents, or drafty windows—these can cause rapid temperature shifts. - Pro tip: Use a seedling heat mat (set to 60–70°F) if your space runs cold, but never exceed 80°F—this can scorch tender leaves.
#### 💧 Boost Humidity Without Overwatering - Mist seedlings lightly 2–3 times a day with a spray bottle (use room-temperature water). - Cover seedlings with a clear plastic dome or plastic wrap (remove daily for airflow) to trap moisture. - Group plants together—they create their own microclimate! - Avoid soggy soil: Check moisture with your finger—top inch should dry slightly between waterings.
#### 🌬️ Shield from Harsh Wind - If seedlings are near a fan, open window, or outdoor breeze, relocate them to a sheltered spot. - Use a small screen or cardboard barrier to block direct wind while allowing airflow. - Pro tip: If growing outdoors, plant in a slightly sheltered spot (like near a fence or under a lightweight shade cloth).
---
If tiny pests (like aphids, spider mites, or thrips) are sucking sap and causing distortion, act fast with organic or chemical controls.
#### 🍳 Spray Copper-Based Fungicide/Pesticide (Best for Fungal & Bacterial Issues) Since your article highlights copper spray, let’s dive into how to use it effectively: - Mix a copper fungicide (like Bordeaux mixture or copper sulfate) following label instructions. - Spray evenly on both sides of leaves and the soil surface (pests hide there too!). - Reapply every 7–10 days or after rain (copper washes off). - Pro tip: Test a few leaves first—some sensitive plants (like tomatoes) may develop copper toxicity (brown spots).
If this happens, rinse with water and reduce concentration.
#### 👨🍳 Organic Pest Control for Soft-Bodied Bugs - Neem oil spray: Mix 1 tsp neem oil + 1 tsp mild soap + 1 quart water. Spray at dusk (avoids harming bees). - Insecticidal soap: Use store-bought or DIY (1 tbsp castile soap + 1 quart water).
Spray until glossy wet. - Introduce beneficial insects: Release ladybugs or lacewings (they eat aphids and mites). - Blast pests off: For aphids, spray with water from a hose (gentle stream) to knock them off.
#### 🔪 Remove Infested Leaves & Quarantine - Snip off severely curled or yellowed leaves with sterilized scissors (dip in rubbing alcohol). - Isolate affected seedlings until pests are gone to prevent spread. - Clean tools and pots with soapy water or bleach solution (1 part bleach to 10 parts water).
---
If leaf curl stems from over- or under-fertilization, adjusting your feeding routine will help.
#### 📊 Flush the Soil to Fix Over-Fertilization - Stop fertilizing immediately if you suspect burn (yellowing, crispy edges). - Water seedlings thoroughly for 3–5 days to leach out excess salts. - Use rainwater or distilled water (tap water can add minerals that worsen imbalance).
#### 💪 Feed with the Right Nutrients - For nitrogen deficiency (pale, yellowing leaves): - Use a balanced fertilizer (like 5-5-5) or fish emulsion (diluted to half strength). - Foliar spray with seaweed extract for a quick boost. - For phosphorus/magnesium deficiency (purple stems, slow growth): - Switch to a phosphate-rich fertilizer (like bone meal) or Epsom salt spray (1 tbsp per gallon). - Pro tip: Avoid high-salt fertilizers (like some synthetic mixes)—they can lock out nutrients and cause curling.
#### 🥗 Improve Soil Health Long-Term - Add compost (1 part compost to 3 parts soil) for better drainage and nutrient retention. - Use perlite or vermiculite in seed-starting mixes to prevent compaction. - Test soil pH (ideal: 6.0–7.0 for most seedlings).
Adjust with lime (to raise pH) or sulfur (to lower pH) if needed.
---
Once your seedlings perk up, keep them healthy with these proactive steps:
- 🌡️ Maintain steady conditions—avoid moving seedlings between hot/cold spots. - 🎯 Harden off gradually before transplanting: Start with 1 hour outside, then increase by 1 hour daily. - 🔥 Use grow lights if natural light is weak (seedlings need 12–16 hours of light/day). - ✨ Rotate trays weekly so all seedlings get even light exposure (prevents lopsided growth). - 🌱 Prune lower leaves (the ones touching soil) to reduce disease risk and improve airflow.
--- By tackling the root cause of your seedlings’ leaf curl—whether it’s environmental stress, pests, or nutrients—you’ll see smoother, stronger growth in just days. And with these prevention tips, your next batch of seedlings will stay crisp, green, and thriving! 🚀
Frequently asked questions
Why do my seedlings develop leaf curl after transplanting?
Transplant shock is a common cause! When roots get damaged during repotting, they struggle to absorb water and nutrients, causing leaves to curl as a stress response. Give seedlings 1-2 weeks to recover in stable conditions with consistent moisture and indirect light—avoid fertilizing during this period.
Can I use copper spray on my seedlings if I suspect fungal infection?
Yes, but use it carefully! Mix 1 tablespoon copper fungicide per gallon of water and spray in the early morning to avoid leaf burn. Test on a few leaves first—some sensitive plants like tomatoes may develop brown spots from copper toxicity. Reapply every 7-10 days until new growth appears healthy.
How do I tell if my seedlings have pests or nutrient deficiency?
Check the leaf pattern: Pests (like aphids or spider mites) cause puckered, distorted curling with visible webbing or tiny insects, while nutrient deficiencies create uniform curling with yellowing (nitrogen) or brown edges (potassium). Use a magnifying glass to inspect leaf undersides for pests—if none are found, test soil pH and adjust fertilizing.
Will my seedlings recover if I fix the problem early?
Seedlings are resilient when caught early. If you address the root cause (water, pests, or nutrients) within 3-5 days, new growth will typically emerge straight and healthy. Severely damaged leaves won't unfurl, but the plant will produce fresh, normal leaves. The key is consistency—keep conditions stable while treating the underlying issue.
Can I use neem oil instead of copper spray for leaf curl?
Neem oil works well for pests (like aphids or mites) but isn't as effective against fungal/bacterial infections that cause curling. For organic pest control, mix 1 tsp neem oil + 1 tsp mild soap + 1 quart water and spray at dusk. For fungal issues, copper spray remains the best choice—neem oil can help prevent secondary infections after treating the primary problem.