
Pests and Diseases
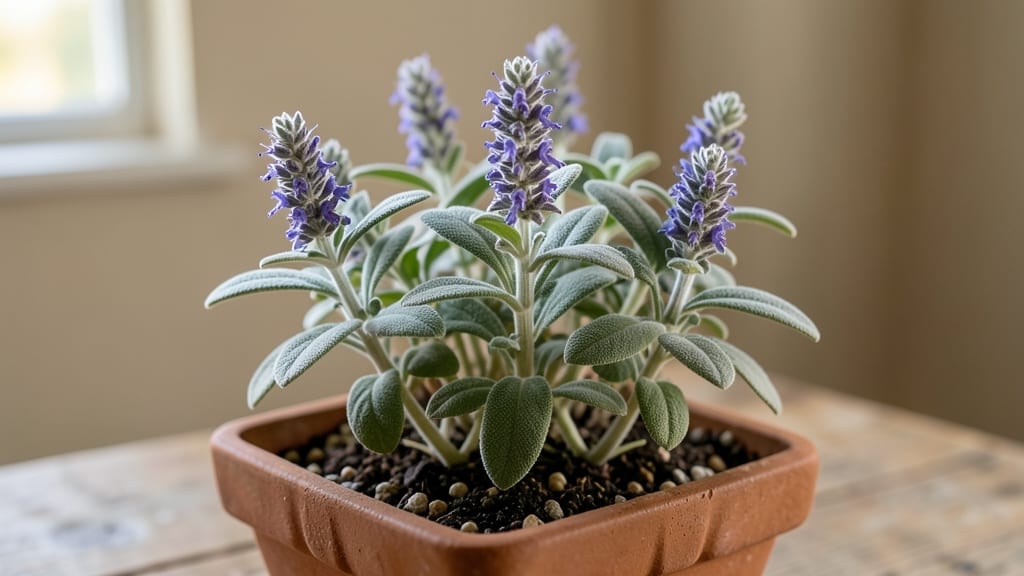
Broadleaf sage thrives when you prune it like a pro—year-round lushness starts with the right cuts. 🌿 I’ve grown this hardy herb for years, and the secret isn’t just when to trim but how to shape it for dense, fragrant foliage that keeps producing through winter.
Skip the guesswork and master the technique that turns woody stems into a bushy, productive plant.
The key is timing: prune right after flowering in early summer to encourage new growth, then do a light trim in late summer to keep it compact. Broadleaf sage loves full sun and well-draining soil—think rocky slopes or sandy mixes—and water only when the top inch feels dry.
Overwatering is the fastest way to kill it, so let that soil dry out between drinks.
With proper pruning, you’ll end up with a sage plant so full it practically spills over its pot, its silver-green leaves releasing that familiar earthy aroma whenever you brush against them.
The best part? It’s drought-tolerant once established, meaning less work for you and more time enjoying its culinary and ornamental value.
Works in zones 5-9, whether you’re growing it in containers, garden beds, or even as a low hedge. Pair it with thyme, rosemary, or lavender for a fragrant, pest-repelling herb trio. Ready to transform your sage from scraggly to showstopping?
📚 In This Guide
- What you need
- Instructions
- Tips and common mistakes
- Wrapping up and next steps
What you need
- ● Sage broad leaf plants: 3–5 healthy nursery-grown plants (ensure they’re labeled as Salvia officinalis or Salvia fruticosa for broad-leaf varieties).
- ● Well-draining potting mix: 5–10 gallons (depending on pot size). Use a blend of 60% garden soil, 30% perlite or coarse sand, and 10% compost.
- ● Containers: 2–3 gallon pots per plant (or a raised bed if gardening in-ground). Ensure pots have drainage holes!
- ● Pruning shears: Sharp, clean bypass pruners (sterilize with rubbing alcohol before use).
- ● Gloves: Heavy-duty gardening gloves to protect hands from prickly stems.
- ● Watering can or hose: With a gentle spray nozzle for hydration.
- ● Organic mulch: 1–2 inches of straw or wood chips to retain moisture and suppress weeds.
- ● Slow-release fertilizer: Balanced 10-10-10 or organic options like fish emulsion (apply sparingly in spring).
- ● Plant labels: To track varieties and pruning schedules.
- ● Pest control: Neem oil or insecticidal soap (for aphids or spider mites).
- ● Sunlight meter: To ensure your sage gets 6–8 hours of full sun daily.
Step-by-Step guide to pruning broadleaf sage for year-round growth
Here's how to keep your sage bushy, fragrant, and thriving through every season.
🌿 Step 1: Identify the Right Time to Prune
Prune broadleaf sage in early spring or right after flowering in late summer. This timing ensures you don't cut back into new growth that hasn't hardened off yet. I always prune mine in March—just as the first tender shoots appear. You'll know it's the right moment when you see fresh green growth starting at the base of the plant.
Never prune in fall or winter—sage is evergreen, but its growth slows dramatically, and cutting then stresses the plant. If you accidentally prune too late, you risk exposing tender wood to winter cold, which can lead to dieback. Wait until you see at least 3-4 inches of new growth before reaching for the shears.
✂️ Step 2: Use Proper Pruning Techniques for Shape and Health
Start by removing any dead, diseased, or crossing branches first—these are your top priority. I use clean, sharp pruning shears to make cuts at a 45-degree angle, about ¼ inch above a leaf node. This angle helps water run off the cut and prevents rot. If you're shaping the plant, cut back to just above a set of healthy leaves to encourage bushier growth.
For broadleaf sage, I never cut more than ⅓ of the plant's total growth at once. Heavy pruning stresses the plant and can lead to leggy growth. Instead, make small cuts over time. You'll notice new shoots emerging within 2-3 weeks of pruning—this is your reward for patience.
☀️ Step 3: Encourage New Growth with Light and Water
After pruning, move your sage to a spot with full sun (6+ hours daily). Sage thrives in bright light, and proper exposure helps it recover quickly. If your plant was previously in partial shade, transition it gradually over 5-7 days to avoid sunburn on new growth. You'll see the leaves perk up and turn a deeper green within a week.
Water deeply after pruning to help the plant recover, but don't overdo it—sage is drought-tolerant. Let the top 2 inches of soil dry out between waterings. Overwatering is the biggest mistake I see with pruned sage, and it often leads to root rot. If the soil feels damp, wait another day before watering.
🌱 Step 4: Maintain Year-Round with Seasonal Adjustments
In spring and summer, pinch back the tips of new growth to encourage a fuller shape. I do this every 4-6 weeks to keep my sage compact and lush. You'll notice the plant fills out more quickly when you consistently trim the tips, which stimulates branching. Avoid heavy pruning during these seasons unless you're shaping for a specific look.
In fall, focus on tidying up rather than heavy pruning. Remove any spent flowers or leggy growth, but leave the overall structure intact. Sage goes semi-dormant in cooler months, and pruning too much can weaken it before winter. A light cleanup keeps the plant healthy without stressing it unnecessarily.
⏰ Step 5: Harvest Strategically for Long-Term Health
Harvest sage leaves throughout the year by snipping just above a leaf node. This encourages more growth and prevents the plant from becoming woody. I harvest mine in morning hours when the oils are most concentrated. Never take more than ⅓ of the plant's foliage at once—this keeps it productive and prevents stress.
If your sage starts to look leggy or sparse, it's a sign to prune lightly again. The key is balance—prune enough to shape the plant but not so much that you stunt its growth. With consistent care, your broadleaf sage will stay vibrant, fragrant, and full for years to come.
Tips & tricks for pruning broadleaf sage
Here's what nobody tells you about keeping your broadleaf sage thriving year after year.
Timing is Everything: The early spring and late summer pruning windows are non-negotiable for broadleaf sage. In Step 1, when you see those first tender shoots in March, that's your cue—pruning too early can expose tender wood to cold, while waiting too long means you're cutting back into new growth that hasn't fully hardened. I've learned this the hard way after seeing winter dieback from late pruning. The 3-4 inch new growth rule is your visual cue that it's safe to prune.
The 45-Degree Angle Matters: In Step 2, when making your cuts, that 45-degree angle isn't just for looks—it's about plant health. The slanted cut prevents water from pooling on the stem, which would otherwise lead to rot. I use my pruning shears to make clean cuts just above a leaf node, and I can always tell when someone hasn't followed this because their plants develop brown, mushy spots at the pruning points.
Sunlight Recovery Strategy: After pruning, moving your sage to full sun (6+ hours daily) is crucial, but don't rush it. If your plant was in partial shade, transition it gradually over 5-7 days in Step 3. I've seen plants go into shock when moved directly to full sun, with leaves turning crispy and brown. The gradual transition gives the plant time to adjust its protective pigments, and you'll notice the leaves perk up within a week.
Watering Wisdom: Sage's drought tolerance is legendary, but that doesn't mean you should neglect watering after pruning. In Step 3, when you water deeply, let that top 2 inches of soil dry out completely before watering again. I've seen too many well-intentioned gardeners overwater and create the perfect conditions for root rot. The key is balance—enough to help recovery, but not so much that you drown the roots.
Pro Tips for Sage Broad Leaf
- Here's what nobody tells you about keeping your broadleaf sage thriving year after year.
- Timing is Everything: The early spring and late summer pruning windows are non-negotiable for broadleaf sage. In Step...
- The 45-Degree Angle Matters: In Step 2, when making your cuts, that 45-degree angle isn't just for looks—it's about p...
Frequently asked questions
Got questions about growing and maintaining sage broad leaf? You’re not alone! Here are some of the most common queries—plus straightforward answers to keep your plants thriving.
What’s the best time to prune broad leaf sage for maximum regrowth?
Prune your Salvia officinalis in early spring (just as new growth starts) or right after flowering (late summer). Avoid heavy pruning in fall—this can stimulate tender new growth that won’t survive winter. Light trimming to shape is fine, but save major cuts for spring!
Why are my sage leaves turning yellow or brown? Is it a pest or disease?
Yellowing leaves often signal overwatering (sage hates soggy roots!) or nutrient deficiency (try a balanced fertilizer in spring). Brown edges? Check for powdery mildew (white fungal spots) or aphids (sticky residue). Isolate affected plants, prune damaged foliage, and improve airflow. Neem oil works well for both!
How long does it take for broad leaf sage to recover after pruning?
With proper care, sage bounces back surprisingly fast! Light pruning (shaping) shows results in 2–4 weeks, while heavy spring cuts may take 6–8 weeks for full regrowth. Keep soil moist (not wet) and place in full sun to speed up recovery. Patience pays off—your bushy sage will be back in no time!
Can I use kitchen sage (common sage) as a substitute for broad leaf sage?
Yes! Common sage (Salvia officinalis) and broad leaf sage (Salvia officinalis ‘Berggarten’) are the same species—just with slightly different leaf shapes. Use them interchangeably in cooking, landscaping, or propagation. Broad leaf has wider, more velvety leaves, but both thrive in similar conditions. Win-win!
Does broad leaf sage survive winter? How should I protect it?
Broad leaf sage is hardy to USDA zones 5–8, but young plants or harsh winters may need help. Mulch heavily (3–4 inches of straw or shredded leaves) around the base in late fall. For zone 5 or colder, wrap the plant in burlap or use a cloche. Prune back dead growth in early spring—new shoots will emerge!
Pro Tip: Revive leggy sage
If your sage stretches tall and sparse, it’s begging for more sunlight! Move it to a sunnier spot and prune back 1/3 of the stems to encourage bushier growth. Within weeks, you’ll see compact, vibrant foliage. Bonus: Harvest the pruned stems for cooking!
Wrapping up and next steps
Mastering the art of pruning your sage broad leaf is your ticket to a thriving, year-round herb garden! With the right tools, timing, and techniques, you’ll keep pests at bay, boost growth, and enjoy fresh sage whenever you need it. Your green thumb is ready—now go nurture that lush foliage!
Ready to take your herb game to the next level? Start small: pick one pruning tip from this guide and try it this week. Before you know it, your sage will be the star of your kitchen and your garden! 🌿✨