Leaf Blower
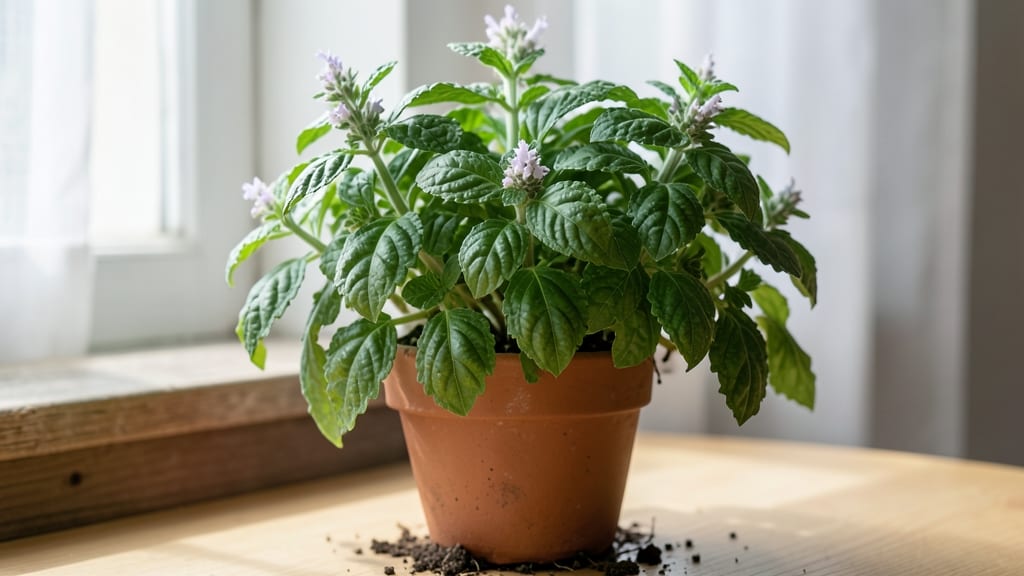
Growing curly leaf basil means fragrant, slow-bolting harvests that last all season. 🌿 I’ve finally found a variety that stays tender and productive in containers—no more bitter, woody stems by summer’s end.
The secret lies in the right balance of light, water, and pruning, plus a few tricks to keep it thriving even when temperatures climb.
You’ll need a sunny spot (at least 6 hours of direct light daily), well-draining potting mix, and a container with drainage holes—even a 6-inch pot works for a single plant. Water when the top inch of soil feels dry, and pinch off flowers to encourage more leaf growth.
With these basics, you’ll harvest fresh, curly leaves for pesto or salads for weeks longer than traditional basil varieties.
📚 In This Guide
- What you need
- Instructions
- Tips and common mistakes
- Wrapping up and next steps
What you need
- ● Curly leaf basil seeds: 1–2 packets (or 10–15 seeds if starting from scratch). Look for heirloom varieties like ‘Curled Basil’ or ‘Spicy Globe’ for that signature slow-bolting trait.
- ● Seed-starting mix or potting soil: A high-quality, well-draining blend (e.g., Miracle-Gro Potting Mix or FoxFarm Ocean Forest). Avoid garden soil—it’s too dense!
- ● Containers: For seedlings: 2–4 small pots (3–4 inches wide) with drainage holes.
- ● For mature plants: 1–2 larger containers (10–12 inches wide) per plant. Use fabric pots or self-watering containers for better airflow.
- ● Drainage trays or saucers: To catch excess water and prevent root rot.
- ○ Grow lights or sunny windowsill: A full-spectrum LED grow light (optional but helpful for indoor setups) or a south-facing window with at least 6–8 hours of sunlight daily.
- ● Watering can with a fine rose: For gentle, even watering.
- ● Fertilizer: A balanced, water-soluble fertilizer (e.g., Fish Emulsion or 10-10-10 NPK) or organic options like compost tea or worm castings.
- ● Pruning shears or clean scissors: For harvesting and shaping your plant.
- ● Slow-release fertilizer pellets: Mix into soil for steady nutrition.
- ● Plant markers: To label your basil and track growth.
- ● Mulch (e.g., straw or coconut coir): To retain moisture and suppress weeds.
- ● Humidity dome or plastic wrap: For seedlings to retain moisture in early stages.
- ● Pest control: Neem oil or insecticidal soap (just in case aphids or spider mites visit!).
Step-by-step instructions for growing curly leaf basil in containers
Here's how I grow this fragrant, slow-bolt basil variety that stays lush in pots all season.
🌱 Step 1: Choose and Prepare Your Containers
Curly leaf basil thrives in 6-8 inch deep containers with drainage holes—no exceptions. I use terra cotta pots because they breathe and prevent root rot. Make sure each pot has at least two drainage holes (drill more if needed) to prevent soggy soil that kills basil roots.
Fill each pot with high-quality potting mix (not garden soil) mixed with 20% perlite or vermiculite for extra drainage. Tap the pot gently to settle the soil—you want it fluffy but not packed. Leave about 1 inch of space between the soil surface and pot rim for watering.
🌿 Step 2: Plant Seeds at the Right Depth and Spacing
Sow 2-3 seeds per pot at a depth of ¼ inch—about the width of a pencil eraser. Planting too deep delays germination, while too shallow exposes seeds to drying out. Cover lightly with a sprinkle of additional potting mix, then mist gently with water until the soil looks evenly moist.
Place the pots in a warm spot (around 70-75°F) with indirect light. Germination takes 7-14 days, but keep the soil consistently moist—never let it dry out completely during this time. Once seedlings appear, thin to the strongest plant per pot, snipping the others at the base with clean scissors.
☀️ Step 3: Provide Bright, Indirect Light for Strong Growth
Curly leaf basil needs 6+ hours of bright, indirect sunlight daily to prevent leggy growth. A south-facing window works, but if your basil starts stretching toward the light, it's not getting enough. Move it within 12 inches of a grow light or rotate pots weekly to ensure even growth.
Watch for pale yellow leaves or stems that bend toward the light—these are signs of insufficient light. Strong basil has deep green, crinkled leaves and stems that stay upright. Water when the top inch of soil feels dry, using room-temperature water to avoid shocking the roots.
💧 Step 4: Water and Fertilize for Maximum Flavor
Water basil at the soil level to keep leaves dry—wet foliage invites fungal diseases. Let the top 1-2 inches of soil dry out between waterings, but never let the soil stay bone-dry for more than a day. Overwatering is the #1 killer of container basil, so when in doubt, wait another day before watering.
Feed with a balanced liquid fertilizer (10-10-10) diluted to half-strength every 2-3 weeks during the growing season. You'll notice richer green leaves and a more intense aroma when you pinch the foliage. Avoid high-nitrogen fertilizers—they promote leafy growth at the expense of flavor.
✂️ Step 5: Harvest and Prune for Continuous Production
Start harvesting when plants reach 6-8 inches tall by snipping the top sets of leaves just above a pair of lower leaves. This encourages bushier growth and prevents flowering, which makes basil taste bitter. Harvest regularly—plants that go unpruned bolt quickly, even in containers.
Pinch off any flower buds as soon as they appear. The moment you see those tiny white flowers, the plant shifts energy from leaves to seeds, and the flavor declines rapidly. With consistent pruning, your curly leaf basil will stay productive and fragrant for 6-8 weeks in containers.
Tips & tricks for growing curly leaf basil in containers
Here's what nobody tells you about growing basil that actually stays fragrant and productive all season long.
Container Material Matters: Terra cotta pots are my go-to because they wick away moisture, preventing root rot that can kill your basil in just days. If you don't have terra cotta, use any container with drainage holes—just avoid plastic, which traps moisture and encourages fungal diseases. Pro tip: Drill extra holes if your pot only has one or two, especially if you're growing in humid conditions.
Germination Secret: The 7-14 day germination window can feel like forever, but you can speed things up by placing pots in a warm spot (around 75°F) with a clear plastic bag loosely draped over them. This creates a mini greenhouse effect while still allowing light penetration. Just remove the bag once seedlings appear to prevent mold. The key is keeping that soil consistently moist without being soggy—think damp sponge, not dripping wet.
Light Troubleshooting: If your basil starts stretching toward the light or developing pale yellow leaves, it's not getting enough light. Move it within 12 inches of a grow light or rotate pots weekly to ensure even growth. I've seen basil go from leggy to bushy in just 3 days after adjusting light exposure. Watch for those deep green, crinkled leaves—they're your sign of perfect light conditions. The moment you see stems bending or leaves losing their vibrant color, it's time to intervene.
Pruning Payoff: That 6-8 week productive window only happens with consistent pruning. Pinch off those tiny white flower buds the moment you see them—they're the plant's way of saying "time to make seeds instead of leaves." I harvest every 2-3 weeks by snipping just above a pair of lower leaves, and my plants stay lush and fragrant for months longer than neighbors who skip this step. The secret is regular maintenance—think of it like giving your basil a haircut every few weeks.
Pro Tips for Curly Leaf Basil
- Here's what nobody tells you about growing basil that actually stays fragrant and productive all season long.
- Container Material Matters: Terra cotta pots are my go-to because they wick away moisture, preventing root rot that c...
- Germination Secret: The 7-14 day germination window can feel like forever, but you can speed things up by placing pot...
Frequently asked questions
How do I keep curly leaf basil from bolting too quickly?
Curly leaf basil is bred to resist bolting longer than traditional varieties, but heat, long daylight hours, or stress can still trigger it. To delay bolting: harvest regularly (pinch off flowers as they form), provide partial shade during peak afternoon sun (especially in summer), and avoid overcrowding. Keep soil consistently moist but not soggy—drought stress speeds up bolting!
How long does it take for curly leaf basil to grow from seed?
Germination takes 7–14 days in warm soil (70–85°F). Once sprouted, seedlings grow 4–6 inches in 3–4 weeks, with full maturity (ready for harvest) in 6–8 weeks. For faster results, opt for transplants—they’ll be harvest-ready in 4–6 weeks. Patience pays off with this slow-bolt variety!
Can I use curly leaf basil the same way as regular basil?
The flavor is identical to sweet basil, but the curly leaves are perfect for garnishes (they hold their shape better) and delicate dishes like caprese salads, pesto, or soups. The main difference? Its longer shelf life and slower bolting make it ideal for container gardening. Pro tip: Chop finely for smooth textures in sauces!
What pests or diseases should I watch for with curly leaf basil?
Common pests include aphids, spider mites, and whiteflies—keep an eye out for sticky residue or tiny webs. Disease risks? Downy mildew (gray fuzz on leaves) and bacterial leaf spot thrive in humid, crowded conditions. Prevent issues by:
- Spraying leaves with water to deter pests ().
- Ensuring 6+ hours of sunlight daily for airflow.
- Removing yellow or spotted leaves immediately.
Is curly leaf basil better for containers than regular basil?
Yes! Its compact, bushy growth and slow-bolting nature make it ideal for containers (5–6" pots work well). Regular basil tends to sprawl, while curly leaf stays tidy—perfect for balconies, windowsills, or small gardens. Just ensure pots have drainage holes and use well-draining potting mix.
Can I grow curly leaf basil indoors year-round?
With the right setup, yes! Place it near a south-facing window (or use grow lights 12–14 hours/day) and maintain 60–75°F temps. Use a small fan for airflow, and rotate the pot weekly for even growth. Watch for leggy stems (a sign of light deprivation)—supplement with LED grow lights if needed.
Wrapping up and next steps
Growing curly leaf basil is a rewarding journey that brings fragrant, slow-bolt leaves right to your doorstep—perfect for containers and busy gardeners! 🌱 With the right care, you’ll enjoy a bountiful harvest of aromatic leaves for months, ideal for pesto, salads, and more.
Whether you’re a beginner or a seasoned green thumb, this variety’s resilience and flavor make it a must-try.
Ready to dive in? Start by gathering your supplies, then plant those seeds or seedlings and watch your basil thrive! 🌿 Next up: Share your progress or ask questions in our gardening community—happy growing!