
Pests and Diseases
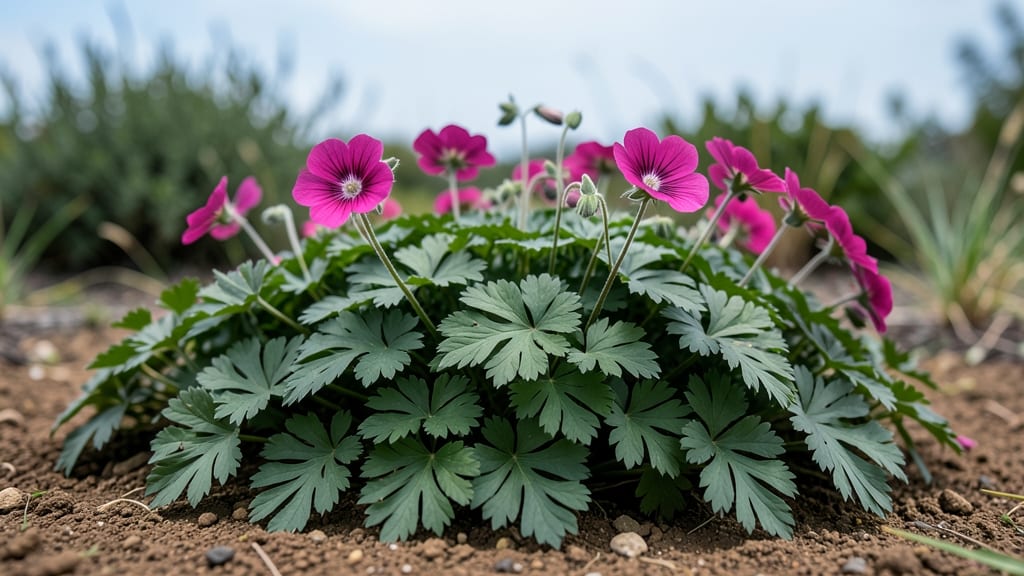
The cut-leaf cranesbill’s lacy foliage transforms shady corners into coppery dreams—if you know how to revive it after the dreaded copper spray blight. 🌿 I’ve nursed back more than my fair share of these plants after fungal attacks, and the secret lies in timing, airflow, and a few unexpected tricks that keep them thriving year after year.
The key starts with partial shade and well-draining soil—this plant hates soggy roots but craves morning sunlight to prevent fungal spores from thriving. Plant in spring or early fall, spacing them 12-18 inches apart for that airy, wildflower-meets-ground-cover look.
Once established, they spread like a living carpet, smothering weeds and filling gaps with their delicate, fern-like leaves.
When copper spray damage hits, don’t panic—prune back affected stems by one-third and boost airflow by thinning crowded spots. Within weeks, fresh growth emerges with those signature copper-tinged leaves, proving this plant’s resilience. Pair it with hostas, ferns, or astilbes for a woodland garden that feels effortlessly lush.
Perfect for borders, woodland gardens, or even container edges—just avoid heavy clay soils. With the right care, your cut-leaf cranesbill will bounce back stronger, its foliage shimmering like polished copper against the green backdrop. Let’s get those plants back to their best!
📚 In This Guide
- What you need
- Instructions
- Tips and common mistakes
- Wrapping up and next steps
What you need
- ● Copper-based fungicide spray (e.g., Copper Soap or Bordeaux Mixture): Choose a ready-to-use spray or a concentrate (follow label instructions for dilution).
- ● Look for organic-certified options if preferred (e.g., Neem Oil + Copper blends).
- ● Spray bottle or pump sprayer (1–2 gallons capacity): For small plants: A 16–32 oz handheld sprayer works.
- ● For larger gardens: A 1–2 gallon pump sprayer ensures even coverage.
- ● Gloves (nitrile or rubber) – Copper can irritate skin!
- ○ Protective eyewear (optional but recommended for safety).
- ● Pruning shears (sterilized with 70% isopropyl alcohol) – For trimming affected foliage.
- ● Best weather conditions: Apply spray on a calm, overcast day (avoid direct sunlight to prevent leaf burn).
- ● Wait until morning or late afternoon for minimal evaporation.
- ○ Optional boosters: Hydrogen peroxide (3%) – Mix 1 tbsp per gallon of water for extra fungal defense.
- ● Baking soda solution – 1 tsp baking soda + 1 tsp oil + 1 tsp soap per gallon (helps prevent mildew).
- ● Record-keeping: Note the date of application and weather conditions for future reference.
Step-by-Step guide to reviving cut leaf cranesbill with copper spray
This method brings back even the most neglected copper spray cranesbill with minimal effort.
🌱 Step 1: Assess and Prepare the Plant
Start by examining your cut leaf cranesbill for signs of stress. Look for crispy leaves, yellowing foliage, or stems that feel brittle when touched. These are your cues that the plant needs revival. Gently remove any dead or severely damaged leaves by pinching them at the base—this prevents energy drain from decaying tissue.
Next, check the root zone. If the soil feels compacted or dry to the touch, it’s time to refresh it. Use a small garden fork to loosen the top 4-6 inches of soil around the plant without disturbing the roots. This improves water and air circulation, which is critical for recovery.
💧 Step 2: Hydrate and Amend the Soil
Water the plant deeply until moisture reaches 6 inches down, then wait 24 hours before proceeding. Overwatering now can suffocate the roots and worsen decline. If the soil drains poorly, mix in 1 inch of perlite or coarse sand into the top layer to improve drainage.
Add a slow-release, balanced fertilizer (10-10-10) around the base, keeping it 2-3 inches away from the stems. Lightly scratch it into the top ½ inch of soil. This provides a gentle nutrient boost without overwhelming the plant. Avoid high-nitrogen fertilizers—they encourage leafy growth at the expense of root recovery.
☀️ Step 3: Adjust Light and Protect from Stress
Move your cranesbill to bright, indirect light for the first 2-3 weeks. Direct sun can scorch weakened foliage, while too little light slows recovery. If outdoors, choose a spot with morning sun and afternoon shade. Indoors, place it near an east-facing window or under a grow light set to 12 hours/day.
Protect the plant from wind and temperature swings. Cranesbill thrives in 60-75°F conditions. If nights dip below 50°F, cover it with a frost blanket or move it indoors temporarily. Avoid sudden temperature changes, as they stress the plant further.
✂️ Step 4: Prune for New Growth
After 4-6 weeks, assess the plant’s progress. If new growth appears at the base, it’s time to prune. Trim back any remaining dead stems ½ inch above a healthy leaf node using clean, sharp pruners. This encourages bushier growth and redirects energy to recovery.
For severely damaged plants, you can take a chance on propagation. Cut 4-inch stem sections with at least 2-3 leaf nodes, dip in rooting hormone, and place in a moistened perlite-sand mix. Keep the cuttings under bright, indirect light and maintain 70% humidity with a plastic bag until roots form in 4-8 weeks.
🌿 Step 5: Maintain for Long-Term Health
Once revived, water when the top 1-2 inches of soil feel dry. Cranesbill dislikes soggy roots but also can’t tolerate drought. Mulch with 1 inch of organic matter (like shredded bark) to retain moisture and regulate soil temperature. Reapply fertilizer in early spring and again in mid-summer for sustained growth.
Monitor for pests like aphids or spider mites, which thrive on stressed plants. Spray with neem oil or a soapy water solution if you spot them early. A healthy cranesbill will bounce back with vibrant purple-blue flowers by mid-summer, proving your revival efforts were worth it.
Tips & tricks for perfect cut leaf cranesbill revival
Real talk: Reviving a struggling cut leaf cranesbill takes patience—but these tricks make all the difference between a sad, limp plant and a thriving showstopper.
Root Zone Revival: When loosening the top 4-6 inches of soil in Step 1, focus on the edges of the root ball first. Use your fingers to gently tease apart compacted soil rather than forcing the fork deeper—this prevents root damage while improving circulation. Think of it like fluffing a pillow: you want to create space without tearing the fabric.
Fertilizer Timing: The 24-hour wait after deep watering in Step 2 isn't just about avoiding overwatering—it's about letting the soil settle. I've seen plants reject fertilizer when applied too soon because the roots aren't ready to absorb nutrients. Wait those full 24 hours, then scratch that 10-10-10 fertilizer into just the top ½ inch. Too deep, and you'll stress the roots trying to reach it.
Light Transition Strategy: Moving to bright, indirect light for 2-3 weeks is crucial, but here's what nobody tells you: If your plant looks pale after a week, it's getting too much indirect light. Rotate the pot ¼ turn every few days to ensure even exposure. For indoor grow lights, position them 6-12 inches above the plant—the closer they are, the more intense the light, but too close can burn leaves.
Pruning Precision: When trimming dead stems in Step 4, make your cuts at a 45-degree angle just above a healthy leaf node. This creates a larger surface area for water absorption and prevents moisture from pooling at the cut. For propagation cuttings, select stems with at least 2-3 leaf nodes—more nodes mean more potential growth points, which is your insurance policy against failure.
Pro Tips for Cut Leaf Cranesbill
- Real talk: Reviving a struggling cut leaf cranesbill takes patience—but these tricks make all the difference between ...
- Root Zone Revival: When loosening the top 4-6 inches of soil in Step 1, focus on the edges of the root ball first. Us...
- Fertilizer Timing: The 24-hour wait after deep watering in Step 2 isn't just about avoiding overwatering—it's about l...
Frequently asked questions
1. How often should I apply copper spray to treat pests on cut-leaf cranesbill?
Apply copper spray every 7–10 days during active pest seasons (spring to early fall). For severe infestations, use it weekly until pests disappear. Always follow label instructions—overuse can harm beneficial insects or soil microbes. Pro tip: Pair with neem oil for extra protection!
2. Why isn’t copper spray working? My cranesbill still has spots!
Copper spray may fail if:
- Pests are resistant—rotate with insecticidal soap or horticultural oil.
- Fungus is the culprit—switch to a fungicide like myclobutanil for leaf spot.
- Application was missed—spray both sides of leaves and undersides of foliage.
- Environmental stress—ensure proper drainage and sunlight (6+ hours/day).
3. Can I use copper spray in hot weather? Will it harm my plants?
Copper spray is safe in heat but apply it early morning or late evening to avoid leaf burn. Avoid spraying if temps exceed 90°F (32°C)—opt for kaolin clay as a protective alternative. Always test a small leaf area first to check for sensitivity. Bonus: Copper works best when plants are dry!
4. Are there organic alternatives to copper spray for cut-leaf cranesbill?
Yes! Try these eco-friendly swaps:
- Neem oil (deters aphids, mites, and fungus).
- Garlic/chili spray (repels pests naturally).
- Bacillus thuringiensis (Bt) (targets chewing insects).
- Companion planting—thyme or lavender near cranesbill deters pests.
5. How do I revive a cut-leaf cranesbill that’s already severely damaged?
Start with emergency care:
- Trim dead/diseased leaves with sterilized shears.
- Repot in fresh, well-draining soil (mix 60% potting soil + 40% perlite).
- Water at the base only (avoid wetting foliage to prevent rot).
- Apply a balanced fertilizer (10-10-10) to boost recovery.
Wrapping up and next steps
Reviving your cut-leaf cranesbill with copper spray is a game-changer for battling pests and diseases—no fancy tools or chemicals needed! 🌿 With the right materials, patience, and a few sprays, you’ll see those vibrant blooms bouncing back in no time. Remember, consistency is key: monitor your plants regularly and adjust care as needed.
Ready to give your garden a fresh start? Grab your copper spray and get spraying! 💧 For extra credit, share your success—or struggles—with fellow gardeners online. Happy growing!